


Hij kreeg de voorstelling, meer een schaduw van een voorstelling, dat het beeld dat je van je leven had, die zeventig of tachtig jaar - dat dat volslagen privé was, en dat je daarin opgesloten was, altijd, dat zelfs al vertelde je alles over je leven tegen een ander, dit beeld toch hoogstpersoonlijk en eenzaam zou blijven, en dat het enige waaraan iemand in een zucht tot onsterfelijkheid gehecht kon zijn die eenzaamheid was. Uiteindelijk, dacht hij, deelden alle mensen op de wereld maar één enkel klein ding met elkaar en dat was de tijd, dit moment, het ogenblik waarin ze leefden en waarin ze werden voortgesleept - ze deelden het met elkaar als willekeurige reizigers een rijtuig van een trein.
 Grip, Stephan Enter, 9789028241794, blz 161

Absoluut, zei hij bij zichzelf, Glenn Gould had absoluut gelijk toen hij zei 'ik weet de exacte verhouding niet, maar ik heb altijd gedacht dat op ieder uur dat je doorbrengt met andere mensen je er x nodig hebt in je eentje. Waar die x voor staat, weet ik niet, twee en zeven achtste uur of zeven en twee achtste uur, maar het is wel een aanzienlijke hoeveelheid tijd'.
Hij ging stoppen met een aanzienlijke hoeveelheid tijd te verliezen."

De eekhoorns huilen op maandag, Katherine Pancol, 9789022326251, blz 575
'Ik kijk.'
Hij pakte een paarse pocket uit de kast, helemaal stukgelezen.
'Emily Dickinson?' vroeg ik.
Ik herken al mijn boeken, zelfs van veraf. Het doet me pijn als iemand ze vastpakt, erin gluurt. Maar dat was nu niet wat me dwarszat.
"

Het evenwicht van haaien, Caterina Bonvicini, 9789044515923, blz 126

Eleanor Roosevelt
Vrouw zoekt berg om tegen op te zien, Noelle Hancock, 9789000500075, blz 74
[REBLOG] How To: avoid loosing the original source of a post
Currently it is a bit hard to figure out who posted something originally (unless you click on 'reblogged from' often enough to get there and then reblog it from there which can get a bit tiresome if the post has been reblogged very often).
There is a way to include the original source in your post so that everybody can see that this is your post. It's a bit fiddly (and you still won't get any notifications if somebody reblogs your post from somebody else obviously) but if you like to know people that this is your post it's the only way (at least currently) and it takes only a few more clicks.
[REBLOG] Easy Tips for Customizing Your BookLikes Blog
On the top of your homepage you’ll notice your navigation bar.

This will bring up your Settings page.

Now Scroll down a bit until you see this:

That’s going to bring up the template customization page. In the upper left hand corner, you’ll see this:
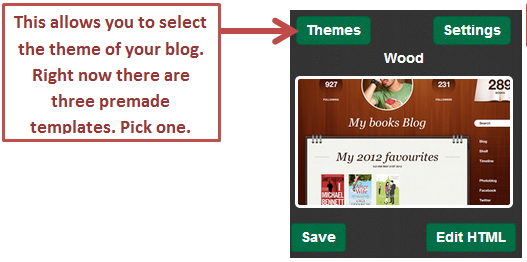
Once that is done, beneath the above posted menu you can scroll down. Do so until you find this:
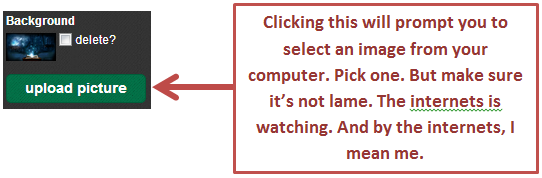
DON’T FORGET TO CLICK SAVE!!!

Now comes the fun part, making that image static. Click on the Edit HTML button.
This is going to split your screen, with your blog showing below and the code window at the top. Don’t freak out. Scroll down through the code until you find these lines:

Now, where you see the green word ‘repeat’, replace that with ‘fixed’. It should now look like this:

DON’T FORGET TO HIT SAVE!

Okay, so as you’ll notice in the screenshot above there’s a drop down menu with the word Blog selected. In order to assure that your background is fixed for all your pages you have to select that drop down and repeat the code change for each one listed:
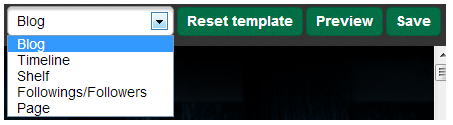
DON’T FORGET TO HIT SAVE FOR EACH ONE!!!
Good luck, everyone. Hope this helps!
[REBLOG] - [Masterpost] Customizing BookLikes
There are quite a few tutorials on how to change the layout of your BookLikes blog. I figured it's good to have them all in one post, and I'd like to thank all who put a lot of work into making them so others can enjoy BookLikes.
Let's start with the customization blogs posted by BookLikes:
Tutorials made by BookLikers for BookLikers:
- Litchick's Easy Tips for Customization
- Litchick's How to Change Your Followers/Following to Something Fun
- AnHeC's How to Move/change your Followers/Following conters
- Jane's How to Customize your BookLikes Blog using CSS
- Jane's Customizing your BookLikes Blog Pt.2
- ThreeRs' Blog about Fonts
- AnHeC's How to change font colour (text, link, comment section)
- AnHeC's Background for Search Bar
Note: All links open in a new window and take you to the original posts and their creators. Leave comments, likes and reblog the hell out of them so others can see it too :)
